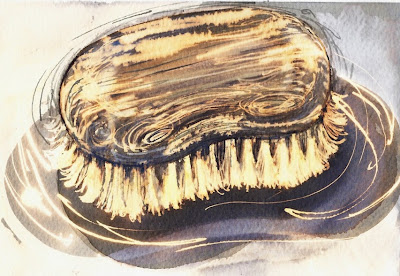
So much for posting every day - just keeping up with drawing is about all I can manage. Day 6's EDM challenge 'something with bristles' immediately made me think of the drawing into ink washes with bleach method that I first tried here. Great for fine lines and scrubby marks. I was asked to post a tutorial by a couple of people on the Facebook page, so here goes:
- Black water-soluble fountain pen ink. Not sure if Parker Quink is available everywhere, it's a standard stationery item here. (the flower on the top is mine :))
- Ordinary household bleach. I wasn't aware of how bad it is for you till someone mentioned it in the comments and I looked it up. Wear gloves and a mask, open the windows and doors!
- Water for rinsing and diluting the ink and bleach - a small nozzled bottle is very useful - and small containers to hold the solutions.
- Old or non-precious brushes. I think bleach would eat any natural bristle
- Bamboo pens or sticks to draw with - likewise bleach would destroy a metal pen nib
- Watercolour or drawing paper - different types will give different results. I masked the edges with tape.
- Things to add texture - sponges, toothbrush, paper towel.
Prepare your paper with ink washes. Vary the dilutions - with Quink you'll see the black separate in places into blue and orangey pigments.
Add textures if you like, flick on ink or bleach solution, dab with paper towel or a sponge - experiment. Allow to dry - or if you start working into the wash while still damp it will give softer edges.
Dilute a little bleach with water in a small container. It seems to work just as well as full strength. Have your reference material or photo at the ready.
I started by bleaching out the negative shapes in my leaf design with an old paintbrush
Adding lines with a bamboo pen - if you dilute the bleach more you can get less stark lines
and some pattern or cross hatching
If you like you can go back in with ink washes, lines and splashes
Not my most successful result, but the more you play around, the more options you'll come up with, and are sure to encounter some happy accidents along the way. I can't vouch for the archival qualities of this method - I've heard that the paper will eventually deteriorate but so far my earlier drawings have survived. Have fun!


4 comments:
Wow, I am embarrassed by my bristles drawing/sketch I did this morning after seeing your lovely painting!! I am definitely going to try this out sometime - it made the brush look sooo good!
~(*o*)~ ʚ(ˆ◡ˆ)ɞ·.•*•♫°•♫·.•ʚ(ˆ◡ˆ)ɞ !
Oh, Cathy, you are doing the similar stuff! We, Sydney Sketch Club members are enjoying an everyday theme. Quite fun and happily sacrifice TV time at night for computing?! Cheers, Sadami
Your painting of your bristle brush glows. And I really enjoyed the tutorial, but honestly, I've ruined so many pieces of clothing while cleaning the bathroom with a bleach cleaner, I have a feeling this technique is not for me. But I enjoyed watching you do it. :)
Beautiful!!
Post a Comment